A Guide to Multihull Trampolines & Netting
When it is time to replace the netting on your multihull, how do you know what to get?
After many years of listening to customers’ questions I have realized that most people
(rightfully) know very little about tensioned netting and thus don’t know how to approach
the replacement. While we certainly would love to sell you a trampoline the purpose of
this guide is to help our customers understand the basics of a trampoline and the variables
to consider…not to sell you one of our trampolines. I spend hours each day answering our
customers’ questions and if I can help address those questions here it will help all of us
and if you should choose to order through us we will all be that much further along in our
conversations.
The trampoline on a multihull catamaran or trimaran serves a few basic purposes:
It should allow sufficient water & wind through the material to allow the catamaran or trimaran
to achieve its designed safety & performance. This is determined by its “openness”. The higher
the openness percentage the more easily wind and water can go through the net and thus the less
force is transmitted from the water/wind into the net -and very important to note here- thus the
less force the net transmits into the attachment points. With a well-made net the failure modes
when water impacts the net are much more often in the attachment points than they are in the net
itself. It is important to note here that water can come from underneath in the form of a wave swell
as well come from top should a wave wash over the net. There is an additional consideration in that
you do not want water being caught on top of the net, but this is generally only an issue on very
tightly woven nets. In short, our experience has shown some general rules of thumb regarding minimum
openness for various multihull designs which can be seen in the chart below:
Boat Type & Net Size
(Total Size Port & Starboard)
|
Minimum Net Openness
|
|
Catamaran Fwd Nets Under 50 sq/ft(~5 sq/m)
|
30%
|
|
Catamaran Fwd Nets 50 to 120 sq/ft(~5-12 sq/m)
|
40%
|
|
Catamaran Fwd Nets Over 120 sq/ft (~12 sq/m)
|
50%
|
|
Performance Cruising Trimaran Bow Nets
|
70%
|
|
Cruising Trimaran Bow Nets Under 100 sq/ft (~10 sq/m)
|
50%
|
|
Trimaran Wing Nets Under 60 sq/ft (~6 sq/m)
|
10%
|
|
Trimaran Wing Nets 60 To 120 sq/ft (~6-12 sq/m)
|
30%
|
|
Trimaran Wing Nets Over 120 sq/ft (~12 sq/m)
|
50%
|
While these are not rules, we have found them to be excellent rules of thumb when considering openness.
Further to these rules of thumb an additional modifier is the use scenario. A boat that is planning
to do exclusively coastal sailing / day charter type boats might consider going with a lower openness
to improve a different aspect of the net (such as comfort/budget/durability – see below) whereas a boat
that is planned to be used for circumnavigation may well go for the higher side of openness for a given size.
The net should offer a sufficiently stable & comfortable platform.
While primary in purpose this is secondary to safety. The net is installed to give more functional space
on your boat while still allowing air and water to flow through as required by the boat design. This space
should be stable enough to access and work on any areas required on your boat. Net platform stability is
determined by a combination of how tightly the net can be laced and the material being used. For most
applications a good lacing design & layout with good installation technique is all that is needed to improve
the platform stability (see lacing patterns below) to an acceptable level, however, material choice can
increase this as well. A low stretch netting (Dyneema) can improve the stiffness of the net, however, taken
to the extreme it can make for a less comfortable net and as a result this material is often more oriented
towards very large openings such as on large Gunboats or on racing-oriented boats where sailors want to be
able to run across the net easily. Webbing nets offer the ultimate in platform stability as they are incredibly
dimensionally stable and due to their flat profile they also rank highly on comfort which leads to…
Ideally, it should also be comfortable while offering a stable platform. Highly open nets are quite uncomfortable
on bare feet or if trying to use the net as a napping or lounging space. By using a more comfortable weave
(with either a flatter profile such as webbing or less openness - but staying within openness profiles for your
net opening size & location) you can significantly increase the comfort of your net and improve the usability
of what amounts to a very significant portion of your living space on the boat. Dollar for dollar spend upgrading
your net is likely the most cost-effective improvement in living space on the boat that you can make when you
consider that you are often significantly improving the functionality of 80 to 150 square feet (~8-15sqm) of space.
The net should last a long time.
It’s not fun to replace a net and a failing net is a safety hazard. Very simply, the net should last as long as possible.
Net durability is a function of the overall net design (base material / DyneemaCore rope border vs grommet border / fabrication design
along with reinforcement materials, and lacing pattern design), how the net is used (how often and in what conditions), and
the UV protection of the net (which is generally a function of the latitude in which it is used. When it comes to net
design there are several important factors. The base material is one important factor. The stronger & more durable the
base material the longer the net is going to last. All things being equal webbing nets are easily going to last the longest,
typically followed by polyester based materials & Dyneema and then nylons. There are further considerations within these
categories that can be delved into in other articles. The type of thread used is another critical factor that is all too
often overlooked. A UV inert thread is critical in gaining maximum life from the nets. Non-UV inert thread will fail in
2-5 years and can ruin an otherwise perfectly well built net. UV inert thread is expensive, so it is one area to be quite
aware of when having a net built. Another factor is the border design. There are two standard border designs – DyneemaCore rope border
& grommet border. Grommet borders can be further reduced to non-reinforced grommet borders & reinforced grommet borders.
In terms of durability the non-reinforced grommet border is generally the weakest, followed by the DyneemaCore rope border, with the
reinforced grommet border being the strongest. The concept that drives this is point loading / stress risers. With a non-
reinforced border or a DyneemaCore rope border the force from the lashing is transmitted almost entirely to the portion of the net immediately
adjacent to the lashing point. A typical lacing point will see 100 – 400 pounds (~45-180kg) of force on it (the amount of force
depends on net usage and lacing design which will be covered later) and if this force is focused on only the fibers immediately
adjacent to the lacing point they will see the most stress and be the most likely to fail. (FIGURES 1 & 2)
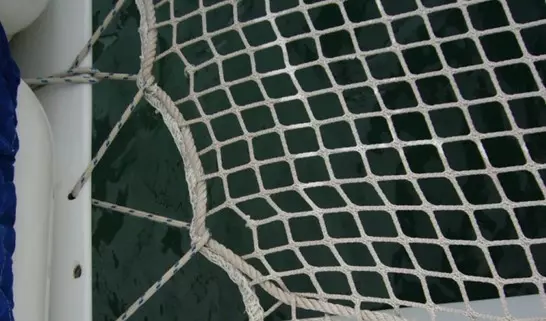
Figure 1: Example Point Load Failure On a Rope Border Net
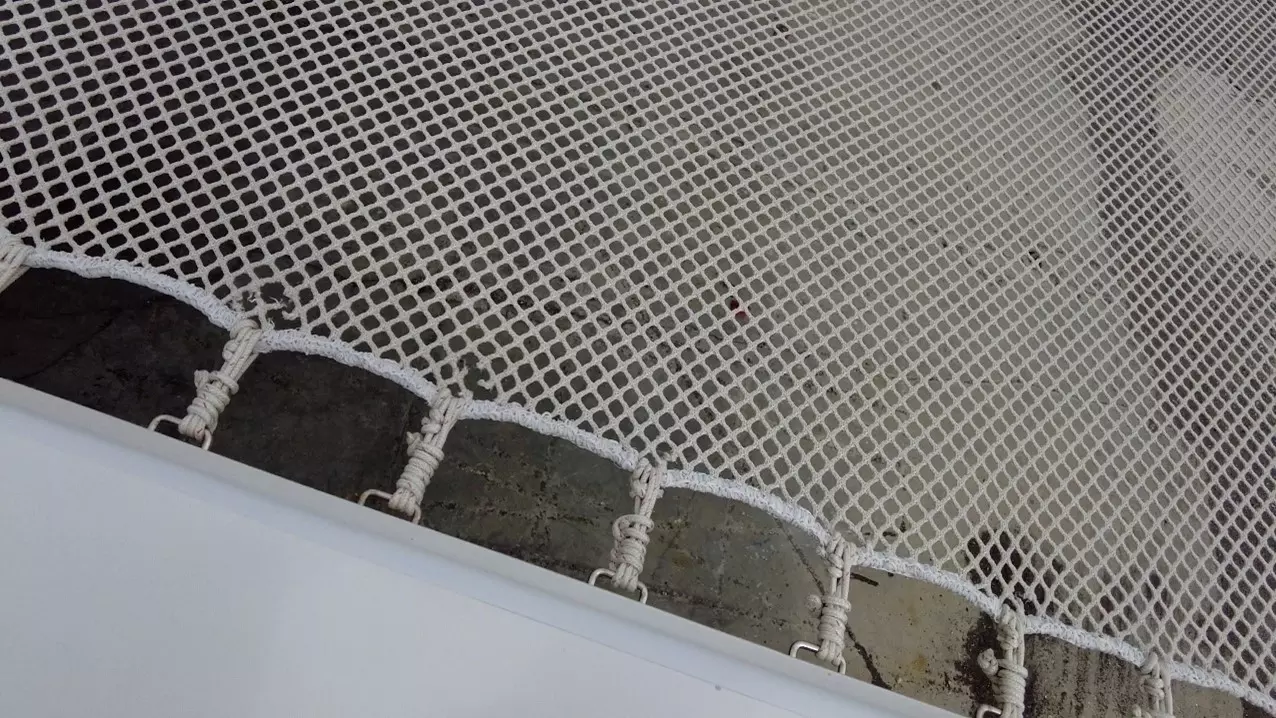
Figure 2: Another Example of Point Load Failure Mode On a Rope Border Net.
This can be seen by the typical failure mode on a rope border net
where the strands immediately adjacent to the lacing point fail first…then like a zipper the force focuses on the next strand which
will be the next to fail. Improved lacing patterns can help with this and there are certainly plenty of situations in which a rope
border can work (Generally with high strength nets such as Dyneema), however, from a design standpoint it cannot be as strong as an
optimally designed reinforced border. With a reinforced grommet border reinforcement is built into the border which will distribute
the stress of the lacing point to the net fibers so long as proper materials are selected and they are sewn on properly (FIGURE 3).
Figure 3: Example Of Reinforced Grommet Border. Note Minimal Scalloping In Grommet Border Edge Which Demonstrates Reduced Point Loading At Lacing Points.
While it will never be perfectly evenly distributed it makes a very significant difference with stress concentrations spread out such
that the stress on the net strands immediately adjacent to the lashing point is shared by the strands farther way. In practice, the
most heavily loaded fibers in a net with a reinforced grommet border have their maximum stress loading reduced to ½ to 1/3 of the
maximum stress on a DyneemaCore rope border fiber. The design & installation method of the reinforcement is critical to actually achieving this
point stress reduction, but when applied well the differences are notable. In our experience a reinforced grommet border can add 25%
to 50% to the life of a net with all other things being equal. Lacing Point Spacing on your boat also plays a role in overall net
durability & tensioning. Lacing points can be either fixed or moveable. Fixed lacing points are commonly used on the Inboard (IB),
Outboard (OB), & Aft areas of the boat openings (Lagoon, Fontaine Pajot, Corsair, Nautitech, Sunreef, Etc commonly employ fixed lacing
points in these areas of the boat opening). These fixed lacing points can come in many styles…they can be holes in a flange, Lacing Buttons,
Ustraps, Eyestraps, Padeyes, or Fairleads. The fixed style of lacing points adds a constraint that the net be designed to match the lacing
points’ location & spacing. Moveable lacing points (typically called lacing slides) are very commonly used in the forward beam of catamarans,
and sometimes are located on the Inboard (IB), Outboard (OB), & Aft areas of the boat opening (Voyage, St Francis, Etc commonly use this
style). One advantage to lacing slides is that if you want to add more to get closer lacing point spacing it is easy to do so. Lacing
Rails are sometimes used as well, these can be in the form of wooden rails with long notches for lacing through or a SS tube mounted along
the inside edge of the opening allowing one to lace around them. The advantages of lacing rails are that they allow nearly unlimited lacing
patterns & spacing. Lacing point spacing determines the lacing point style that can be used
(More Info on Lacing Patterns)
& the spacing of the
grommets on a reinforced grommet net. In general, the grommets are best when spaced 3-1/2” to 5” apart from each other as wider spacing
increases the load at each lacing point (Figure 4).
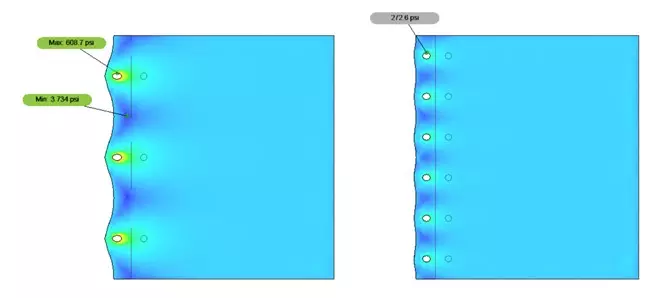
Figure 4: Finite Element Analysis Of Grommet Spacing (8" on left, 4" on right). Note Increased Max Load (608psi vs 272psi) & Deeper Scalloping On Left.
Your net designer should take this into account when designing the net to your boat. Lacing point hardware is expensive, and many manufacturers
space a little wider than ideal as a result. If lacing point spacing is wider than about 6-3/4” (171mm) then a double lacing pattern (Figure 5)
is recommended to better distribute the lacing point loading on the net.
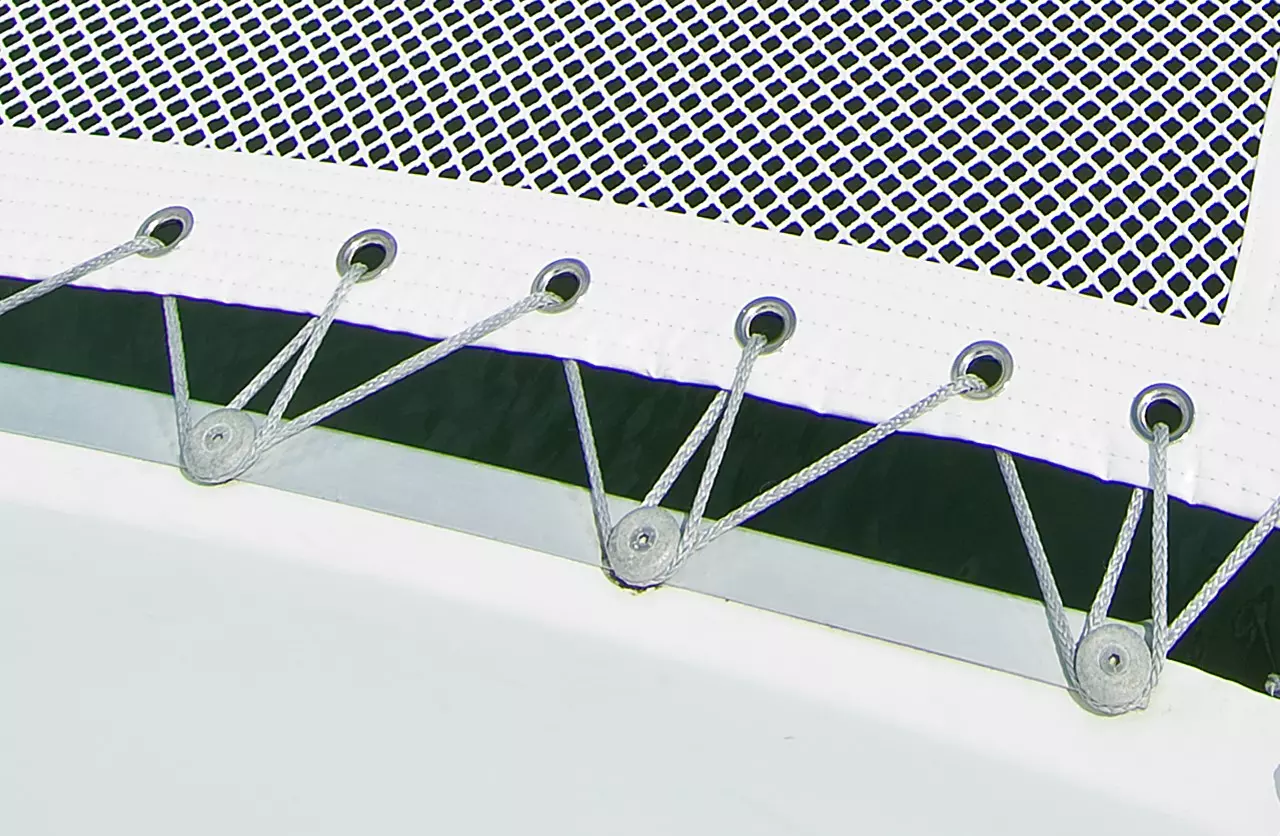
Figure 5: Double Lacing Pattern On Lacing Buttons / NetKnobs
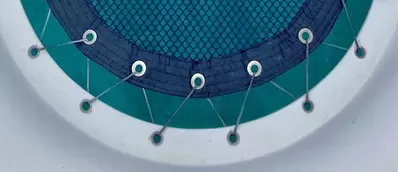
Figure 6: Alternating Lacing Pattern To Lacing Holes
For Lacing point spacing under 5-1/4” (133mm) an alternating (Figure 6), individual,
or perpendicular lacing pattern can be a good fit. In between these two (5-1/4” to 6-3/4”) is a bit of a no-man’s land…grommet spacing
would be too tight to go to a double lacing pattern & is wider than ideal for the other patterns…in these cases your designer should try to
understand your intended usage and can make a few adjustments to make the best possible net for your boat. Lacing line angle of approach is
another variable that should be considered. Lacing line functionas as a tension transmitter – you apply tension to the lacing line and then
some portion of that tension is applied to the net itself.
The amount of tension transferred from the lacing line to the net is a function of the lacing line approach angle…the steeper the approach
angle the more efficiently the tension is transmitted from the lacing line to the net and this will vary from 100% efficiency for a
perpendicular lacing pattern with the lacing line perpendicular (normal to the net in engineering parlance) to the net to around 10% for a
very shallow lacing pattern. An approximate sweet spot is when the lacing line has an approach angle of around 40 to 45 degrees at which point
about 70% of the lacing line tension is being transmitted to the net (See Figure Below).
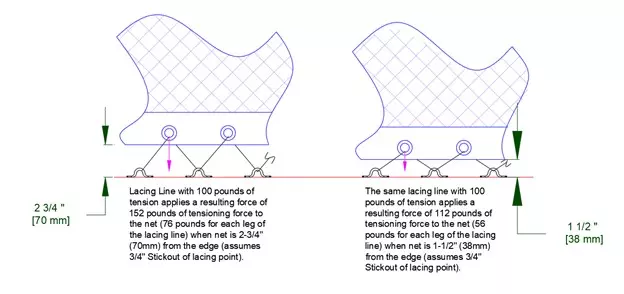
Figure 7: Example Efficiency Of Lacing Line Transfer As Function Of Lacing Gap With Alternating Lacing Pattern.
A further consideration when it comes to lacing is if the lacing line distributes the loading. An individual lacing line that uses a single
piece of line to lash the edge of the net directly to the boat in a perpendicular fashion will not distribute the shock load from someone
stepping on the net directly next to the lacing point. A continuous line lacing pattern will act to distribute load by allowing a very small
amount of give where the load is applied and will result in significantly longer life of the net with a small tradeoff of having slightly more
give in the net. For a racing boat, this may not be acceptable, but for most cruising boats this is actually an ideal solution as an additional
inch or two of deflection on the net is generally acceptable.
Boat manufacturers are now starting to incorporate netting design companies into their design process allowing optimal netting attachment point
design from the start which allows for the longest lasting, best tensioned net possible for a given boat opening and we encourage all manufacturers
we work with to let us help them by designing the optimal lacing point layouts during their boat design process.
Net usage naturally plays a further role in the life of the net. The main factors are how heavily the nets are loaded, how often the nets
are used, and if there is foreign material introduced to the net. Naturally, nets that are heavily loaded are going to see reduced lifespans.
Boats such as day charters that plan to put many people on the net at once (>3 or so) should take this into account when designing their nets.
For boats such as day charters webbing nets can add a great deal to the life of the net while also making a better platform for large loads due
to their very high stability. How often the nets are used is often a factor of if the boat is a liveaboard or charter boat vs being a part time
pleasure craft for the owners. Foreign material introduction is an overlooked factor as well. If sand is introduced to the boat by foot (such as
is seen more often on day charters) or in the form of blown dust (such as the relatively common Sahara Dust) it can work its way into the fibers
and inside acts as a microscopic cutting instrument that will accelerate net failure. This can be addressed by reducing sand tracked onboard
as well as by using a net designed with a coating that protects the fibers by blocking sand from being able to work its way into the fibers
(typically this will be the same coating that is applied for UV protection). UV Damage is one of the largest factors in net failure. UV rays
are strongest near the equator and decrease as one moves away from the equator. It is very common to see nets that are not UV protected fail 3
times as fast near the equator when UV damage is the failure mode. Nets can come in non-UV protected, a thin application UV protection, and a thicker
protective UV coating.
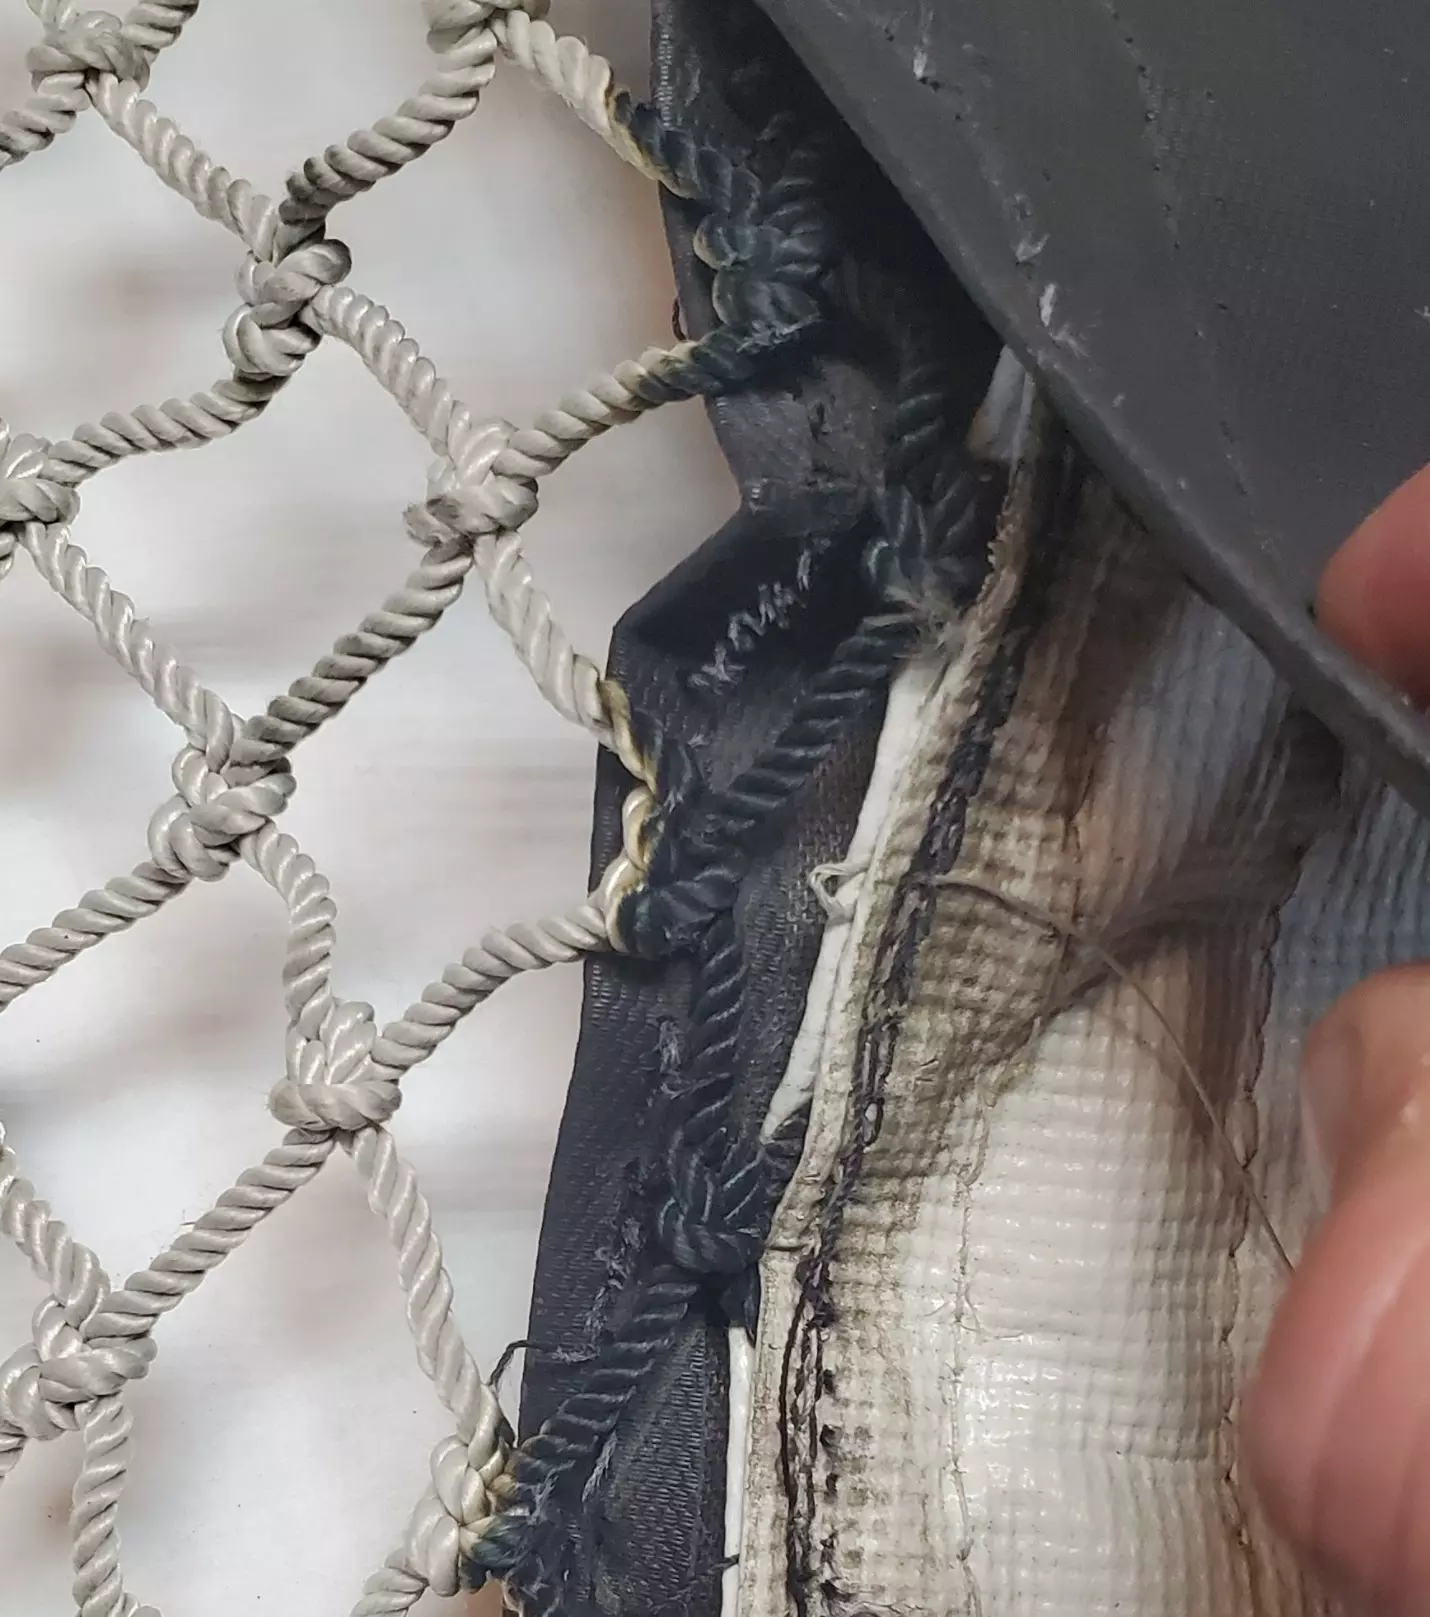
Figure 8: Closeup Of "Black" Net With Thin UV Protective Coating. Note The "Black" Remains Only Under The Border After UV Exposure Leading To Early Failure.
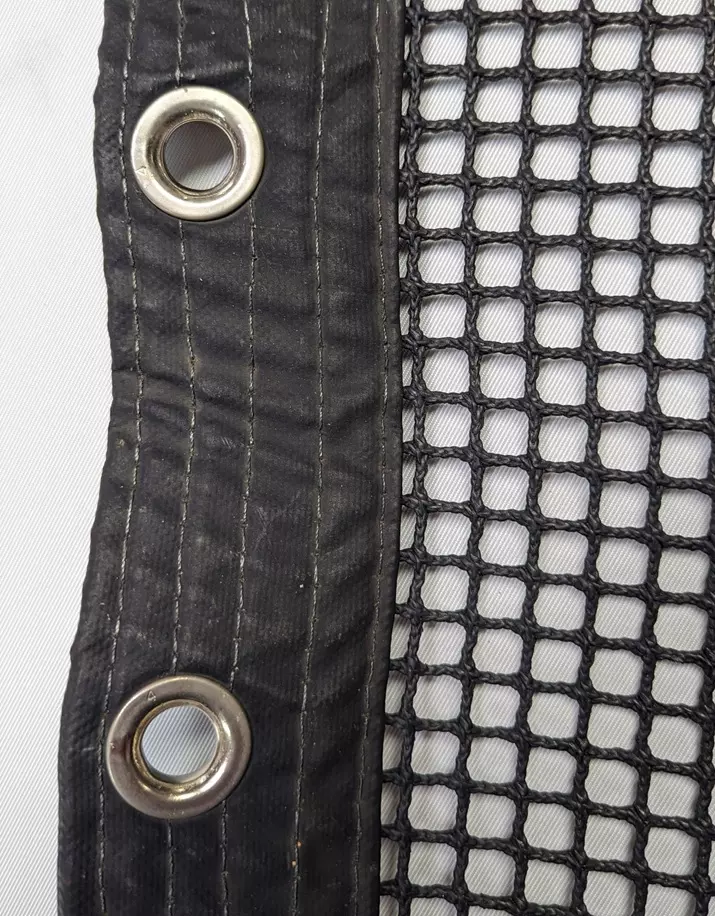
Figure 9: Example Picture Of 10 Year Old Net, Coated Black With Thick UV Protection. Note Color Remains Unchanged & UV Protection Remains. Net Should Have another 3-5 Years Of Life.
While our data is best for our own nets we typically find our customers in tropical regions replacing nets that are non-UV protected in 3-5 years,
those with a thin spray UV protection in 4-7 years, and those with a thicker UV protective coating in 12-15 years (note that the thicker UV coating
is also protecting against sand working into the fibers). This of course can vary by base material, but is a good average for the type of netting
seen on most catamarans or the bows of most trimarans. One of the best ways to ascertain the actual durability of the net is to get the manufacturer
warranty on the net, most manufacturers will offer a full warranty for their nets for a duration of 1/3 to 1/2 of the expected net lifespan.
The net should look good. The netting on a multihull can be an afterthought, or it can be a well-thought-out addition to your boat’s overall
aesthetics. The color of net selected can affect the ease of maintenance of the boat, the ease with which you can see through the net (apparent
transparency), the overall aesthetics of the boat, and in certain cases the net’s temperature. While white is often selected, colors such as grays,
blues, and blacks are excellent for hiding small marks on the nets. Many people will select one of these colors to reduce the appearance of scuff
marks or dirt on the nets and reduce the required maintenance time. An often-overlooked consideration in net selection is the apparent transparency.
A net of a given openness will be MUCH easier to see through if it is black (or a darker color) than if it is white because your eyes adjust to the
bright reflection of the white net and will then be lacking the dynamic range needed to make out the darker details in the water under the net.
Camera dynamic range reacts rather similarly to the eye and examples of how much more detail can be seen through the exact same material can be seen
below (Figures 10 & 11).

Figure 10: Example White Net. Note Difficulty Viewing Water Beneath It.
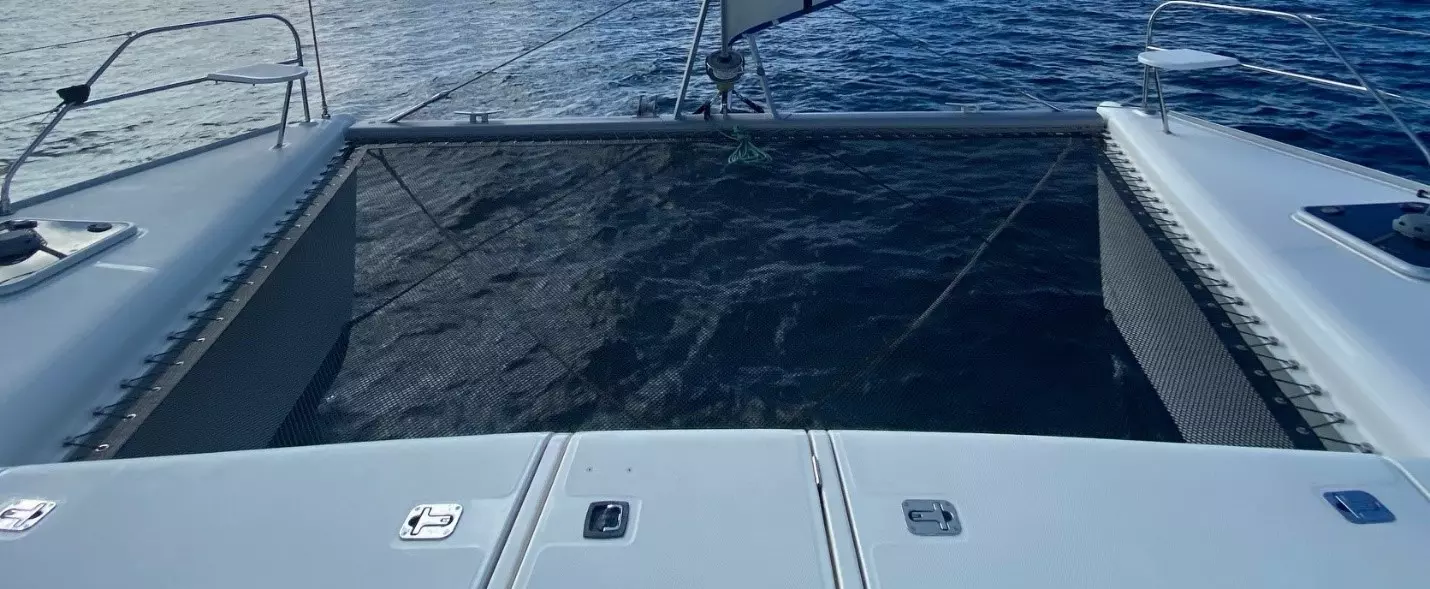
Figure 11: Example Black Net. Exactly The Same Material & Viewing Angle As White Net Above, But Much Easier To See Through Due To Its Darker Color.
Nets are often bought in a simple white or black, but there are many other color options available for many of the materials and you can really add to
the boats visual appeal with a good color choice. Depending on the manufacturer you may also be able to get border colors that are complementary and
add to the visual appeal. For example, a black border with a Dark Blue net adds a lot of visual appeal to this boat (Figure 12).
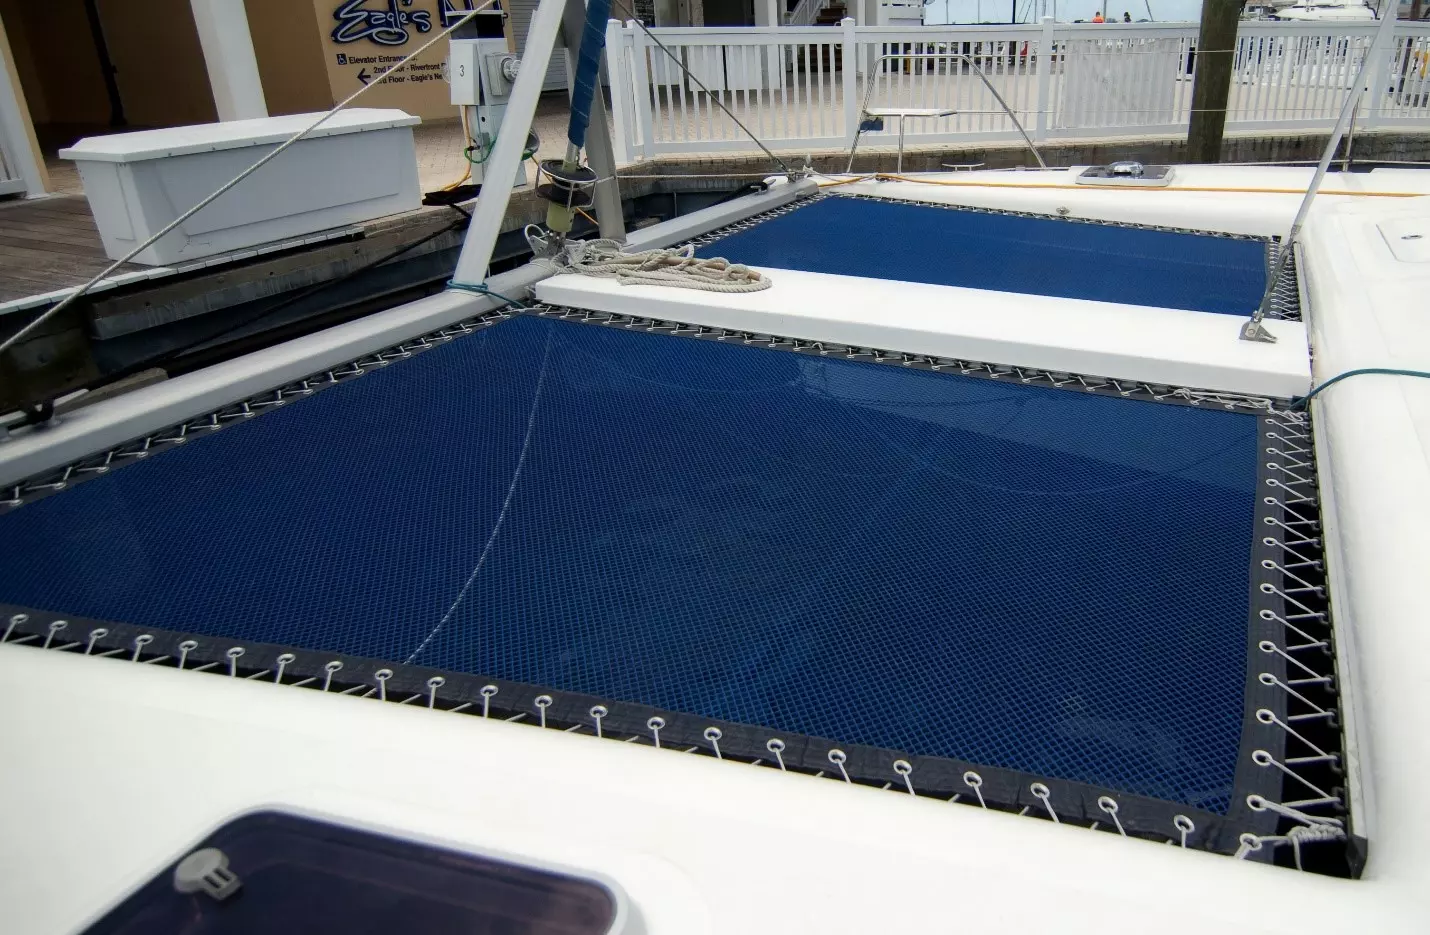
Figure 12: Net In Dark Blue With Black Border & Silver Lacing Line (Black Lacing Line Works Well Also With This Color Combination).
One question that is often asked is if dark or black nets get hot. The answer is…sometimes. Most nets have such a high surface area to thermal
mass that they release the heat as quickly as it comes in and have very slight (generally completely negligible) temperature increases while also storing
very little heat energy that they can transmit to your foot. A black border which has some more thermal mass to it will get rather warm to the touch but
this is rarely a concern as the border is not generally stood on anyways. A high thermal mass net such as a webbing net will get warmer although they’ll
remain usable. A good way to understand this is to consider how easily you can touch Aluminum Foil directly out of the oven…although just as hot as the
casserole dish, it has such low thermal mass that it cannot transmit enough heat into your skin when you touch it to burn you.
The net should fit well. A well fitted net will be safer (proper sized lacing gaps), perform better (it will be able to be tensioned to design),
and will look better with even gaps all the way around. It will also be designed to fit with a little more gap than you need so that when the net stretches
you have room to re-tension the net before the edge of the net hits the lacing points (Figure Below)
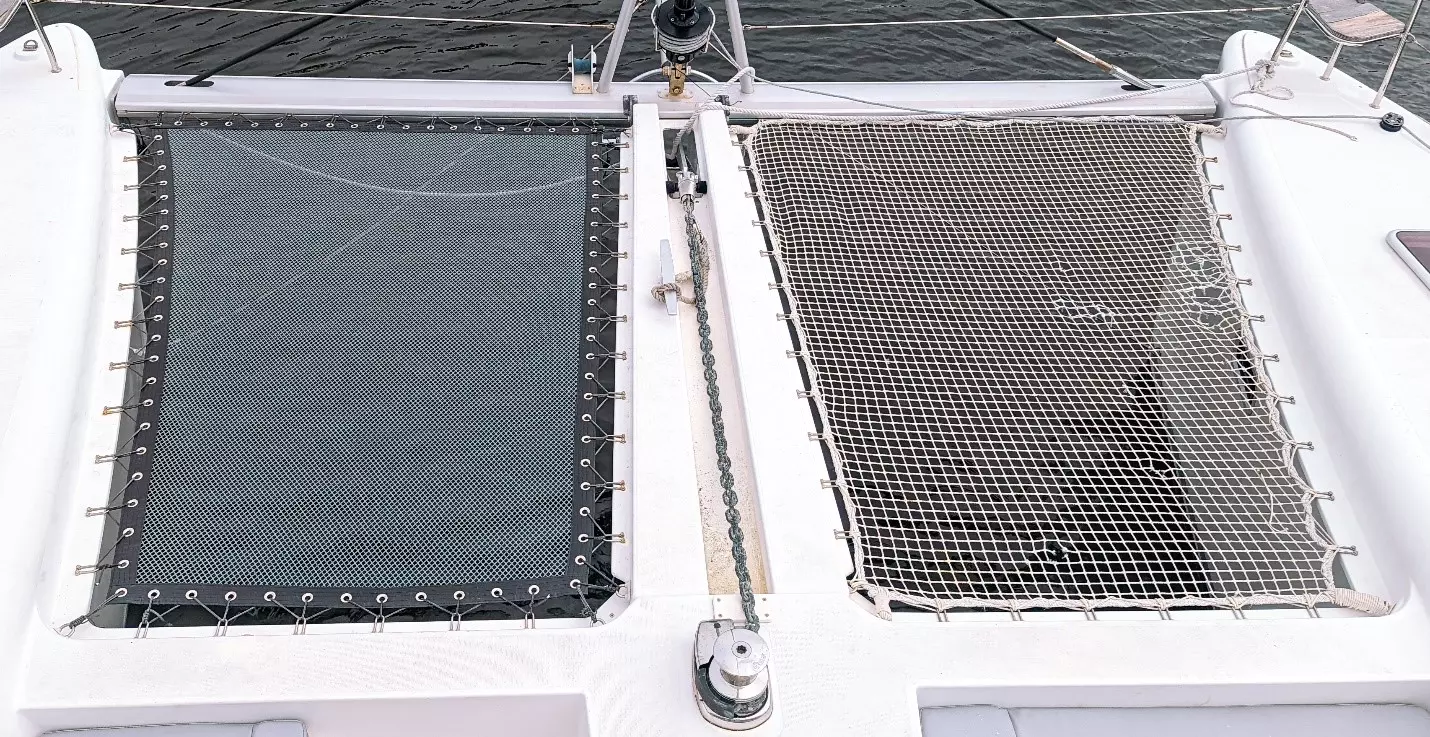
Figure 13: Original Net (right) Vs Properly Sized Replacement Net (left). Note Net On The Right Is Loose Because It Is Too Tight To The Lacing Points & Has No Room To Be Tensioned Any Further. New Net On The Left Is Well Tensioned & Has A Little Room To Stretch & Be Retensioned Through Its Life.
otherwise the net will lose the ability to be tensioned when it stretches. Whether you have a standard model (eg Leopard 45) or a fully custom boat the
net should be designed to fit your boat. Some boat models are quite consistent (eg the Leopard 45 is well standardized) while others – particularly those
with a long production run can have a lot of variation (Figure Below) in both the overall boat opening size for the trampoline & the layout, number, and type of lacing points.
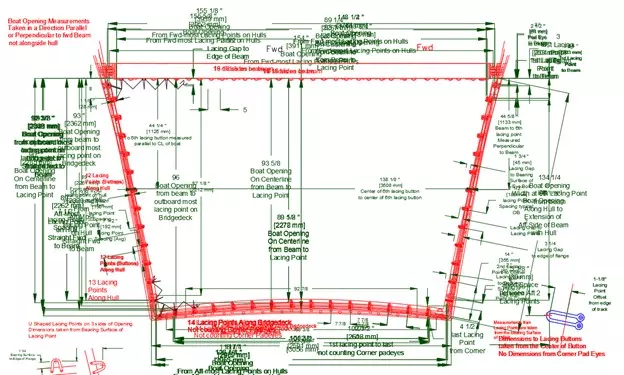
Figure 14: Example Drawing(s) Of Lagoon 380. These Are Just (5) Of The 28 Drawing Layers We Have On File For This Boat To Demonstrate Dimensional Variability Within One Model.
In particular, Lagoons switched lacing types from lacing buttons to U-straps partway
through production of some models, there are actually 3 types of lacing attachment points in the Lagoon 380 example drawing history in the Figure above. To
get your net to fit correctly you will need a proper drawing check to your boat for models that have variation…for boats with significant variation a
generically made net that is designed to fit all variations will not fit most variations properly. If you have a custom or rare model of boat you will want to
find someone that can execute your boat design accurately. It can be a bit difficult to fully capture a complex boat opening design, but it is possible.
The more pictures & details you can supply the company you are working with and the more accurate the details they can supply you to check to your boat the
better your fit will be. There are techniques such as the
3-point triangulation technique
that you can use to define very complex shapes to be easily within ¼”.
Choosing a net:
When selecting a net you are working within your own personal constraints & preferences. There is no single best net for all people, boats, & situations.
In general, you will be selecting the net that offers the best balance of function, comfort, durability, & aesthetics that fits within your given personal
desires for the net along with your budget. The manufacturer you select should be able to help you choose a net that is well-designed for your application,
and they will typically be able to offer several net options for you to choose from. Do keep in mind that there is time/headache/safety cost to end-of-life/net
replacement that in most scenarios should be factored in when considering lower durability nets. For example, a significantly more expensive net expected to
last 12-15 years vs a net expected to last 3-5 years can be a good value when multiple replacements are considered across the life of the net (CHART BELOW):
|
|
Expected
Lifespan
|
Warranty
|
Initial Net
Cost
(including
shipping)
|
Installation
Time / Cost
year 1
|
Net Cost
year 5
|
Installation
Time / Cost
year 5
|
Net Cost
year 9
|
Installation
Time / Cost
year 9
|
Total Cost -
Net(s) Only
|
Total
Installation
Time / Cost
|
Net
#1
|
4 Years
|
2 Years
|
$749.00
|
6 Hours /
$900
|
$749
|
6 Hours /
$900
|
$749
|
6 Hours /
$900
|
$2247
|
18 Hours /
$2700
|
Net
#2
|
12 Years
|
5 Years
|
$2037.00
|
6 Hours /
$900
|
$0
|
0 Hours /
$0
|
$0
|
0 Hours /
$0
|
$2,037
|
6 Hours /
$900
|
At the end of the day, so long as you are aware of the variables you are able to select the net that is right for you…only you know how
important each of the variables are to you, but you should now understand the variables that should be playing a role in your decision-making
process and be better versed in what you are looking for in trampoline netting for your Catamaran or Trimaran.