Directions for 3 point dimensioning
Overview:
3 Point dimensioning is useful for establishing non-standard dimensions which are
commonly presented on multihull net openings. By triangulating measurements one is able to
recreate any geometry. In process, one lays out enough points to on the edge of the boat
opening such that one can interpolate the overall dimensions from the points laid out. We would
recommend laying these out using masking tape and writing and “X” and numbering the points
as they go. Then make a sketch of the opening showing where each point is located on the
sketch. Also, take a picture of the net from as close to overhead as possible ensuring to get all
the edge of the boat opening. This allows us to see the layout points and better interpolate
between the measured points. A typical net will take 15-20 points, with a very complex net
possibly requiring more. The points should be placed in all corners, at all inflection points
(where a curve changes direction), and should be placed in at least 2 locations along any
radiused curve (such as a hull curve). The person measuring then picks 3 points roughly evenly
spaced around the opening and labels them A, B, & C…these will be the points dimensions to
all the other points are pulled from.
-
Lay out all points. Use masking tape and a sharpie to number and put an “X” at the point
to ensure measurement to the exact point can be repeated. Make sure the point is at the
net-side edge of the boat opening (eg, on the inner edge of a lacing track, or inner edge
of a lacing rail) as we will be offsetting the net lacing gap from this point.
-
Make a sketch of the layout showing all numbered points in their approximate location on
the sketch.
-
Take a picture of the entire opening so that we can see the general layout.
-
Pick (3) of the numbered spots approximately equally spaced out and label them (A), (B)
and (C). I would suggest two adjacent corners and roughly mid-point of the opposite
side. The exact location of them does not matter.
-
Take measurements from point A to all other points. Ensure the tape measure is
measuring from “X” at point A. You want these measurements to be within 1/8” if
possible, although within ¼” is typically workable. If you have a helper this is much
easier, however, if you can anchor the tape measure at the point you can do this alone.
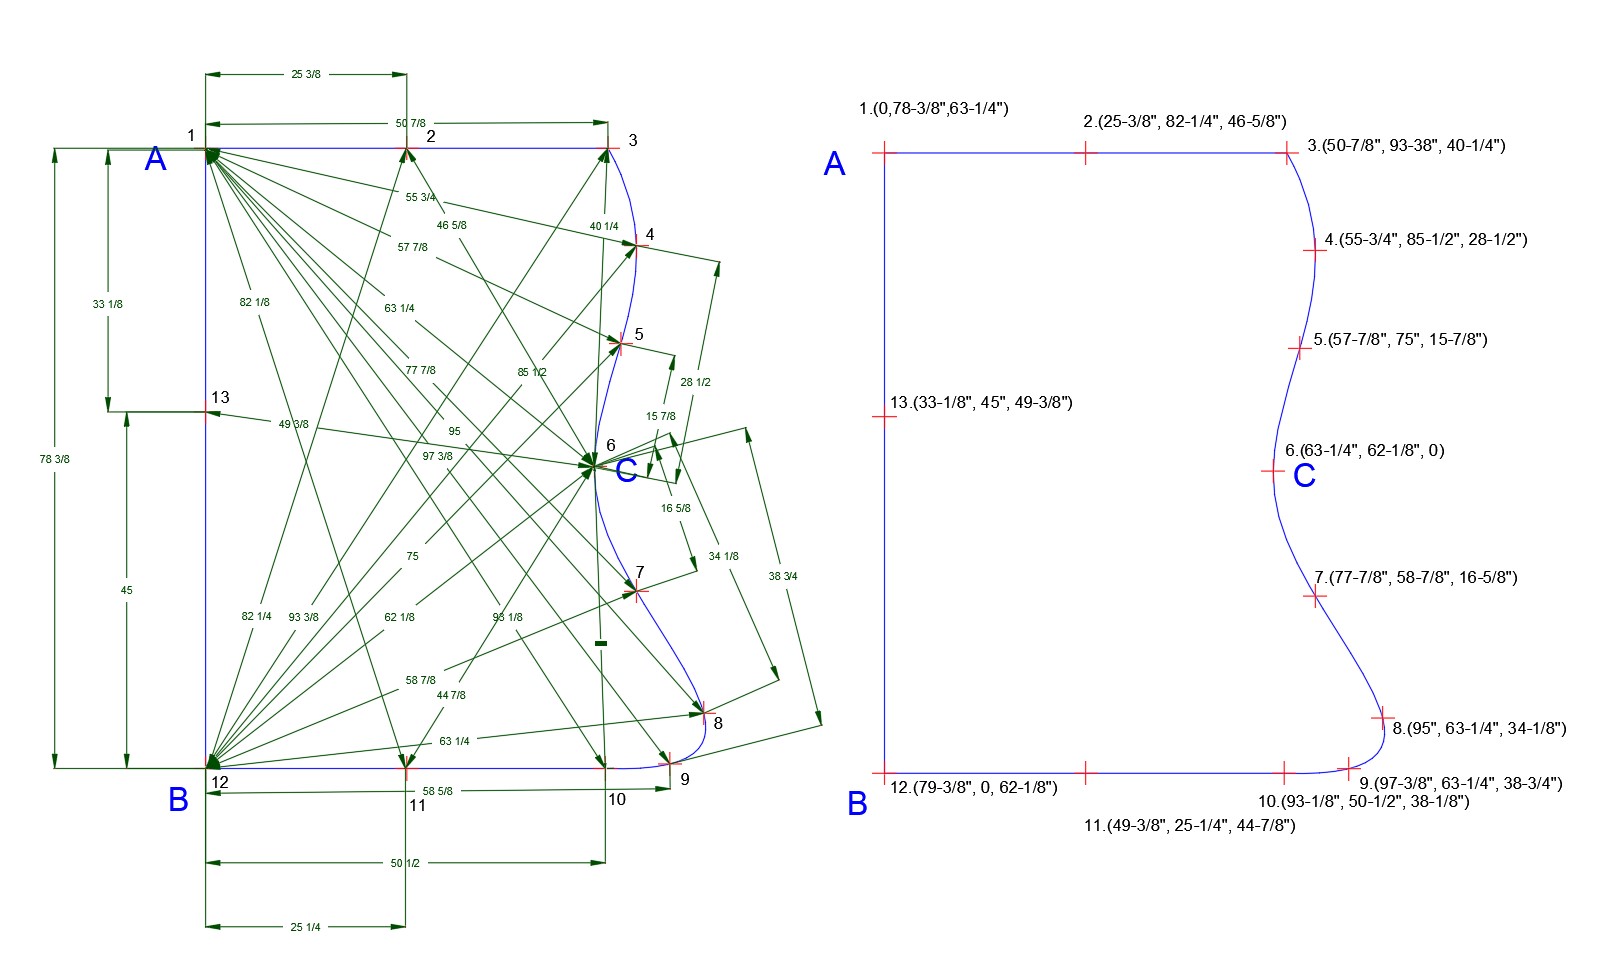
The dimensions are to be entered at each point in the form (Dimension from A,
Dimension from B, Dimension from C). If possible, please note the dimensions in just
inches). For example, on the attached drawing pdf point 1 is labeled (0”, 78-3/8”, 63-1/4”)
because it is 0” from point A (point A is on point 1), 78-3/8” from point B, and 63-1/4” from
point C.
-
Repeat this from point B & C. When you are done you should have something that looks
like the right half of the example drawing.
-
Scan and send your sketch with the dimensions and also attach the picture(s) of the net.